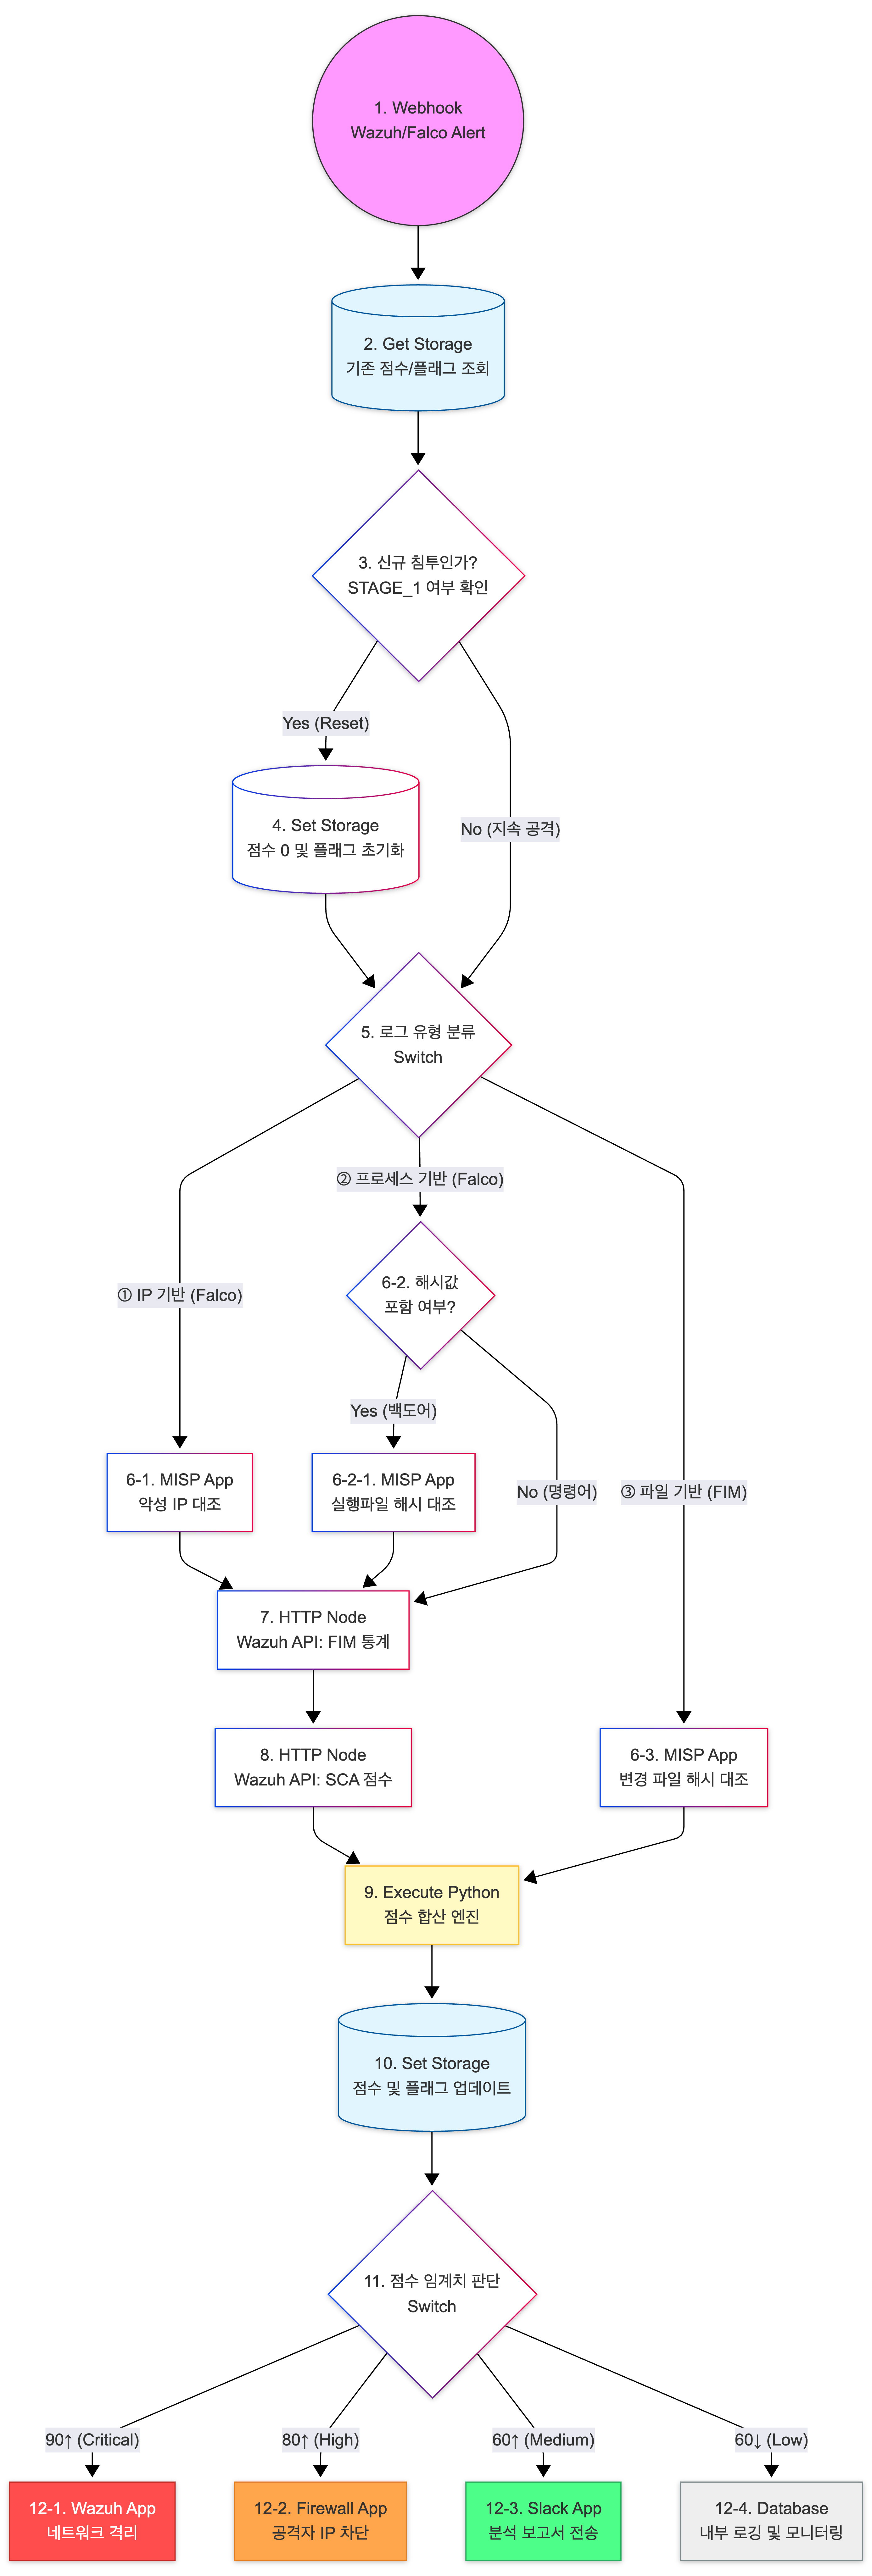
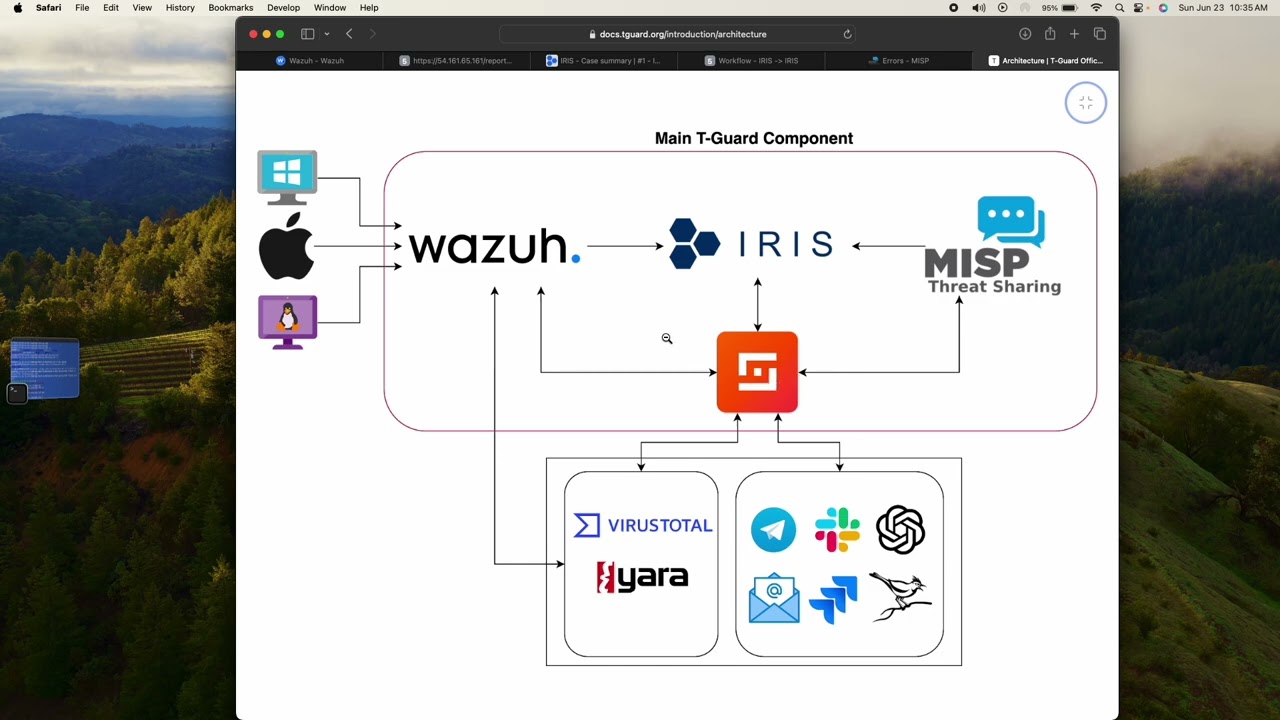
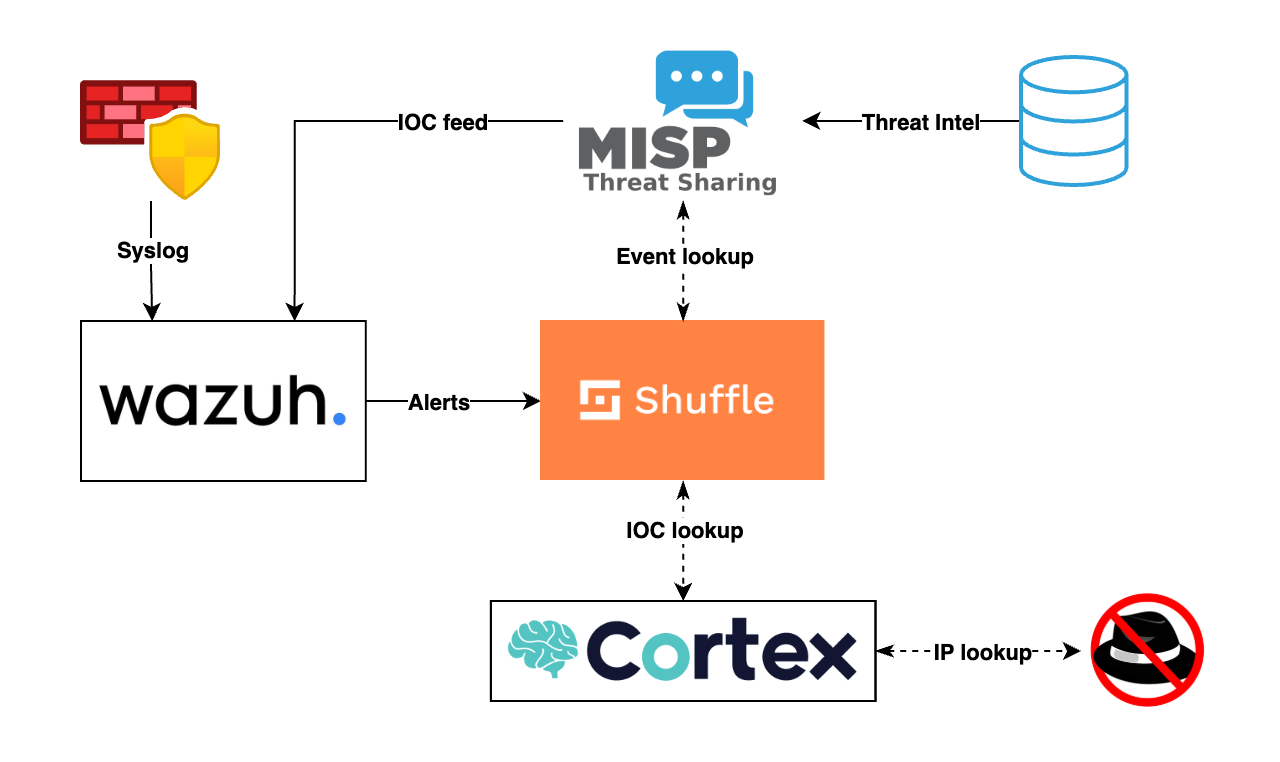
점수 합산 : Get Cache로 해당 IP의 기존 점수를 가져와서 새 로그의 위험도를 더한 뒤 Set Cache로 다시 저장
임계치 대응 : 합산된 점수가 임계치(예 : 80점)을 넘으면 차단 및 알림
로그 수신 및 상태 로드 (Nodes 1~4)
webhook
: 설정 완료
Get Storage (by Agent ID)
Key: agent_score_{{ $exec.all_fields.agent.id }}
Technical Context: 만약 데이터가 없다면(신규 에이전트), {"total_score": 0, "sca_applied": false}라는 기본값을 반환하도록 설정
Filter (RS인지 아닌지)
Condition: {{ $exec.all_fields.rule.id }} 가 STAGE_1으로 시작하는가?
항목 이름 의미 예시 (3번 노드 설정값)
Input list
어떤 데이터를 가져와 검사할 것인가?
{{ $exec }}
Field
로그 데이터 중 어떤 항목을 볼 것인가?
all_fields.rule.id
Check
어떤 기준으로 비교할 것인가?
Starts with
Value
비교할 실제 값은 무엇인가?
STAGE_1
Set Storage
노드 이름: Prepare_Reset_Data (자유롭게 지정 / 추후 이어짐)
예시 코드
import json def handler(event, context): # 1. 이전 노드($exec)로부터 agent_id 추출 agent_id = event.get("all_fields", {}).get("agent", {}).get("id", "default_agent") # 2. 저장할 때 사용할 Key와 초기화할 Value 정의 return { "storage_key": f"score_{agent_id}", "reset_value": { "total_score": 0, "sca_applied": False } }
4.2. set cache value
Key: {{ $Prepare_Reset_Data.storage_key }}
Value: {{ $Prepare_Reset_Data.reset_value }}
4.1. execute python
공격 분류 (Nodes 5)
로그 분류
노드 이름 : Log_Classifier (”%)
단순히 문자열 태그를 생성
예시 코드
def handler(event, context): all_fields = event.get("all_fields", {}) # 1. 데이터 추출 remote_ip = all_fields.get("data", {}).get("fd", {}).get("rip") rule_groups = all_fields.get("rule", {}).get("groups", []) # 2. 분류 로직 # ① IP 정보가 있고 Falco 관련 로그일 때 if remote_ip and any("falco" in g.lower() for g in rule_groups): category = "IP_Falco" # ② IP는 없지만 Falco 관련 로그일 때 (프로세스/명령어 기반) elif any("falco" in g.lower() for g in rule_groups): category = "Process_Falco" # ③ 파일 무결성 감시(FIM) 관련 로그일 때 elif any("syscheck" in g.lower() for g in rule_groups) or "syscheck" in all_fields.get("rule", {}).get("id", ""): category = "FIM" else: category = "Unknown" return { "category": category, "remote_ip": remote_ip }
5.2. filter항목 의미 예시
Input List
어떤 노드의 데이터를 가져올 것인가?
{{ $Log_Classifier }}
Field
가져온 데이터 중 어떤 항목을 비교할 것인가?
category
Check
어떤 기준으로 판별할 것인가? (연산자)
EQUALS (일치함)
Value
비교 대상이 되는 실제 값은 무엇인가?
IP_Falco (또는 FIM 등)
5.1. execute python
misp 조회 및 wazuh 조회 (Nodes 6~8)
misp 조회
입력값항목 (Field) 설정해야 할 값 의미
Value
{{ 조회할 대상 데이터 }}
가장 중요합니다. 실제 IP나 Hash 값이 들어가는 곳입니다.
Type
(조회 대상에 맞게 선택)
IP면 ip-dst, 해시면 sha256 등을 선택하여 검색 속도를 높입니다.
Returnformat
json
셔플 다음 노드(점수 합산)에서 데이터를 처리하기 가장 쉬운 형식입니다.
EnforceWarninglist
True
구글, 클라우드플레어 등 안전한 IP를 악성으로 오탐하는 것을 방지합니다.
기타 옵션 (추가하고 싶으면)필드 이름 추천 설정값 의미 및 설정 이유
Enforcewarninglist
True
(필수 권장) Google, Cloudflare 등 '안전한 IP'가 MISP 블랙리스트에 실수로 등록된 경우 이를 결과에서 제외합니다. 오탐(False Positive)을 획기적으로 줄여줍니다.
IncludeContext
True
위협 정보만 가져오는 게 아니라, 해당 위협이 어떤 공격 그룹(APT 등)과 관련 있는지 등의 맥락 정보를 함께 가져옵니다. 나중에 보고서(Slack)를 쓸 때 풍부한 내용을 담을 수 있습니다.
Returnformat
json
(필수) 셔플의 다음 노드(Python 점수 합산)에서 데이터를 구조적으로 읽으려면 반드시 JSON 형식이어야 합니다.
셔플 서버와 Wazuh 매니저 사이에 별도의 프록시 서버(대리 서버)를 거쳐야 하는 특수한 보안 환경이 아니라면 필요 없습니다.
timeout
10 (입력 권장)
비워두면 무한정 대기하거나 시스템 기본값에 따릅니다. API 응답이 늦어질 경우 워크플로우 전체가 멈추는 걸 방지하기 위해 10(초) 정도 적어주는 것이 좋습니다.
to_file
false (또는 비워둠)
중요: 이 값을 true로 하면 API 결과가 파일 형태로 저장되어 나중에 파이썬 노드에서 텍스트로 읽기가 매우 까다로워집니다. 점수 계산을 위해 데이터를 직접 처리해야 하므로 반드시 false여야 합니다.
가중치 합산 및 저장(Nodes 9~10)
점수 합산 (execute python)
예시 파이썬 코드
import json def handler(event, context): # 1. 이전 단계 데이터 가져오기 (노드 이름 확인 필수) # Get_Cache_2: 2번 Get Storage 결과 # MISP_Search: 7번 MISP 결과 # Wazuh_FIM: 8번 FIM 통계 결과 # Wazuh_SCA: 9번 SCA 결과 current_cache = event.get("Get_Cache_2", {}) misp_data = event.get("MISP_Search", {}) fim_data = event.get("Wazuh_FIM", {}) sca_data = event.get("Wazuh_SCA", {}) total_score = current_cache.get("total_score", 0) sca_applied = current_cache.get("sca_applied", False) # 2. MISP 점수 가산 (블랙리스트 일치 시 +30) if misp_data and len(misp_data.get("Attribute", [])) > 0: total_score += 30 # 3. FIM 점수 가산 (최근 변경 이력 존재 시 +20) if fim_data and fim_data.get("affected_items"): total_score += 20 # 4. SCA 점수 가산 (중복 합산 방지 로직) if not sca_applied: failed_count = sca_data.get("total_failed", 0) if failed_count > 0: total_score += min(failed_count * 5, 40) # 최대 40점 제한 sca_applied = True # 5. 최종 결과 반환 return { "total_score": total_score, "sca_applied": sca_applied, "agent_id": event.get("all_fields", {}).get("agent", {}).get("id"), "raw_log": event.get("all_fields") }
Set cache value (데이터 업데이트)
Key: score_{{ $10_Execute_Python.agent_id }}
Value: {{ $10_Execute_Python }} (JSON 전체 저장)
임계치 판단 및 자동대응(Nodes 11~12)
임계치 판단 (execute python)
def handler(event, context): # 1. 11번(또는 10번) 노드에서 계산된 최종 데이터 가져오기 # 노드 이름이 'Set_Cache_Update'라고 가정할 때의 예시입니다. final_data = event.get("Set_Cache_Update", {}) score = final_data.get("total_score", 0) agent_id = final_data.get("agent_id", "unknown") # 공격자 IP 추출 (로그 구조에 따라 경로 확인 필요) attacker_ip = final_data.get("raw_log", {}).get("data", {}).get("fd", {}).get("rip", "unknown") # 2. 결과 저장을 위한 기본 구조 action_plan = { "score": score, "agent_id": agent_id, "attacker_ip": attacker_ip, "severity": "", "should_isolate": False, "should_block_ip": False, "should_notify_slack": False, "should_log_internally": False } # 3. 임계치 판단 로직 (12단계) if score >= 90: action_plan["severity"] = "Critical" action_plan["should_isolate"] = True action_plan["should_block_ip"] = True action_plan["should_notify_slack"] = True elif score >= 80: action_plan["severity"] = "High" action_plan["should_block_ip"] = True action_plan["should_notify_slack"] = True elif score >= 60: action_plan["severity"] = "Medium" action_plan["should_notify_slack"] = True else: action_plan["severity"] = "Low" action_plan["should_log_internally"] = True return action_plan
🚨 [{{ $Action_Planner.severity }}] 등급 위협 감지 및 자동 대응 보고위협 점수: {{ $Action_Planner.score }}점대상 Agent ID: {{ $Action_Planner.agent_id }}공격자 IP: {{ $Action_Planner.attacker_ip }}현재 시스템에 의해 자동 격리/차단 조치가 수행되었습니다.